(spelling) Tag: Visual edit |
(beachbrawl, catch bombs, tutorial maps) Tag: Source edit |
||
| (42 intermediate revisions by 17 users not shown) | |||
| Line 1: | Line 1: | ||
| − | [[Image:Realms.jpg|thumb|right|375px| |
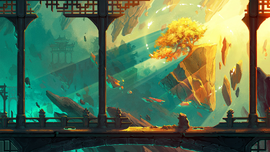
+ | [[Image:Realms.jpg|thumb|right|375px|Map Selection Screen in Training Mode]] |
| − | Realms refer to the myriad stages and locations where the battles of [[Brawlhalla]] are fought. These can vary from prehistoric temples of bone and stone to floating platforms above a steam-driven Victorian city. Some correspond to certain characters and themes, others do not. |
+ | '''Maps''' (previously called Realms) refer to the myriad stages and locations where the battles of [[Brawlhalla]] are fought. These can vary from prehistoric temples of bone and stone to floating platforms above a steam-driven Victorian city. Some correspond to certain characters and themes, others do not. |
| + | Maps can come in three sizes: small, standard, and big. Each map has a standard sized variant, while only certain maps have small, big, or both variants. Typically, smaller maps are intended for 1v1 and larger maps are intended for free-for-all matches, however this is different per map. |
||
| ⚫ | |||
| − | *[[Brawlhaven]] |
||
| − | *[[Grumpy Temple]] |
||
| − | *[[Twilight Grove]] |
||
| − | *[[Kings Pass]] |
||
| − | *[[Thundergard Stadium]] |
||
| − | *[[Titan's End]] |
||
| − | *[[Blackguard Keep]] |
||
| − | *[[The Enigma]] |
||
| − | *[[Mammoth fortress]] |
||
| − | *[[The Great Hall]] |
||
| − | *[[Shipwreck Falls]] |
||
| − | *[[Lost Labyrinth]] |
||
| − | *[[Miami Dome]] |
||
| − | *[[The Fangwild]] |
||
| − | *[[Plains of Passage]] |
||
| − | *[[Warshuttle|Warshuttle (experimental)]] |
||
| + | In [[Custom Online]] lobbies, players can vote for what map they want to play and change the [[Map Set]] freely. Maps are selected randomly in [[Casual Matchmaking]] and [[Ranked]], but the player has the option to ban a single map from play. |
||
| ⚫ | |||
| + | |||
| ⚫ | |||
| + | ===Regular Maps=== |
||
| + | The following maps can be played on in regular gamemodes: |
||
| + | |||
| + | {{Itembox/top}} |
||
| + | {{itembox|width=300|height=200|name=Brawlhaven|image=Map Brawlhaven.png}} |
||
| + | {{itembox|width=300|height=200|name=Grumpy Temple|image=Map GrumpyTemple.png}} |
||
| + | {{itembox|width=300|height=200|name=Twilight Grove|image=Map TwilightGrove.png}} |
||
| + | {{itembox|width=300|height=200|name=Kings Pass|image=Map KingsPass.png}} |
||
| + | {{itembox|width=300|height=200|name=Thundergard Stadium|image=Map ThundergardStadium.png}} |
||
| + | {{itembox|width=300|height=200|name=Titan's End|image=Map Titan'sEnd.png}} |
||
| + | {{itembox|width=300|height=200|name=Blackguard Keep|image=Map BlackguardKeep.png}} |
||
| + | {{itembox|width=300|height=200|name=The Enigma|image=Map TheEnigma.png}} |
||
| + | {{itembox|width=300|height=200|name=Mammoth Fortress|image=Map MammothFortress.png}} |
||
| + | {{itembox|width=300|height=200|name=The Great Hall|image=Map TheGreatHall.png}} |
||
| + | {{itembox|width=300|height=200|name=Shipwreck Falls|image=Map ShipwreckFalls.png}} |
||
| + | {{itembox|width=300|height=200|name=Lost Labyrinth|image=Map LostLabyrinth.png}} |
||
| + | {{itembox|width=300|height=200|name=Miami Dome|image=Map MiamiDome.png}} |
||
| + | {{itembox|width=300|height=200|name=The Fangwild|image=Map TheFangwild.png}} |
||
| + | {{itembox|width=300|height=200|name=Plains of Passage|image=Map PlainsOfPassage.png}} |
||
| + | {{itembox|width=300|height=200|name=Apocalypse|image=Map Apocalypse.png}} |
||
| + | {{itembox|width=300|height=200|name=Tree Fort|image=Map TreeFort.png}} |
||
| + | {{itembox|width=300|height=200|name=Demon Island|image=Map DemonIsland.png}} |
||
| + | {{itembox|width=300|height=200|name=Crystal Temple|image=Map CrystalTemple.png}} |
||
| + | {{itembox|width=300|height=200|name=Temple Ruins|image=Map TempleRuins.png}} |
||
| + | {{itembox|width=300|height=200|name=Galvan Prime|image=Map GalvanPrime.png}} |
||
| + | {{itembox|width=300|height=200|name=Sun Drive City|image=Map SunDriveCity.png}} |
||
| + | {{itembox|width=300|height=200|name=Spirit Realm|image=Map SpiritRealm.png}} |
||
| + | {{itembox|width=300|height=200|name=World's End|image=Map World'sEnd.png}} |
||
| + | {{itembox|width=300|height=200|name=The Turtles' Lair|image=Map TheTurtlesLair.png}} |
||
| + | {{itembox|width=300|height=200|name=Fortress of the Lions|image=Map FortressOfTheLions.png}} |
||
| + | {{itembox|width=300|height=200|name=Suzaku Castle|image=Map SuzakuCastle.png}} |
||
| + | {{itembox|width=300|height=200|name=Void Major|image=Map VoidMajor.png}} |
||
| + | {{Itembox/bottom}} |
||
| + | |||
| + | ===Gamemode Specific=== |
||
| + | The following maps can only be played on certain gamemodes: |
||
| + | |||
| + | {{Itembox/top}} |
||
| + | {{itembox|width=300|height=200|name=Dodgebomb|displayname=Dodgebomb Arena|image=Map DodgebombArena.png}} |
||
| + | {{itembox|width=300|height=200|name=Bombsketball|displayname=Bombsketball Arena|image=Map BombsketballArena.png}} |
||
| + | {{itembox|width=300|height=200|name=Beachbrawl|displayname=Beachbrawl Arena|image=Map BeachbrawlArena.jpg}} |
||
| + | {{itembox|width=300|height=200|name=Platform King|image=Platform King Stage.jpg}} |
||
| + | {{itembox|width=300|height=200|name=Brawlball Arena|image=Map BrawlballArena.png}} |
||
| + | {{itembox|width=300|height=200|name=World's End Arena|image=Map World'sEndArena.png}} |
||
| + | {{itembox|width=300|height=200|name=Kung Foot Arena|image=Map KungFootArena.png}} |
||
| + | {{itembox|width=300|height=200|name=Synthwave Kung Foot|image=Map SynthwaveKungFoot.png}} |
||
| + | {{itembox|width=300|height=200|name=Brawldown|displayname=Brawldown Ring|image=Map Ring.png}} |
||
| + | {{itembox|width=300|height=200|name=Under the Canopy|image=Map UnderTheCanopy.png}} |
||
| + | {{itembox|width=300|height=200|name=Capture the Flag|displayname=Demon Island CTF|image=Map DemonIslandCTF.png}} |
||
| + | {{itembox|width=300|height=200|name=Temple Climb (Map)|displayname=Temple Climb|image=Map TempleClimb.png}} |
||
| + | {{itembox|width=300|height=200|name=Siege of Lions|image=Map SiegeOfLions.png}} |
||
| + | {{itembox|width=300|height=200|name=Spirit Realm Showdown|displayname=<small>Spirit Realm Showdown / Divine Spirit Showdown</small>|image=Map SpiritRealmShowdown.png}} |
||
| + | {{itembox|width=300|height=200|name=Arashikage Dojo|image=Map Arashikage Dojo.png}} |
||
| + | {{itembox|width=300|height=200|name=Horde|image=Map Horde.png}} |
||
| + | {{itembox|width=300|height=200|name=Walker Attack!|image=Map WalkerAttack.png}} |
||
| + | {{itembox|width=300|height=200|name=Training#Catch Bombs Training|displayname=Catch Bombs|image=Map CatchBombs.png}} |
||
| + | {{itembox|width=300|height=200|name=Tutorial|displayname=Tutorial Maps|image=Map Tutorial1.png}} |
||
| + | {{Itembox/bottom}} |
||
| + | |||
| + | ==Test Maps== |
||
| + | Test Maps are special maps that are generally added so the devs can receive feedback on the map's design. These maps can only be accessed through custom games with the test maps setting enabled, or through experimental queues (if any are available). Unlike regular maps, test maps do not have any finalized theme, instead reusing art assets from other maps. |
||
| + | |||
| + | If a test map is well received, it will graduate into a full map, where it will receive a new name and theme. Otherwise, test maps will either stay exclusively as test maps or become entirely unavailable after some time. |
||
| + | |||
| + | ===Available Test Maps=== |
||
| + | Currently, there is only one available test map: |
||
| + | |||
| + | {{itembox/top}} |
||
| + | {{itembox|width=300|height=200|name=Wheel|image=Map Wheel.png}} |
||
| + | {{itembox/bottom}} |
||
| + | |||
| + | ===Unavailable Test Maps=== |
||
| + | ''This list is a work in progress:'' |
||
| + | |||
| + | {{itembox/top}} |
||
| + | {{itembox|width=300|height=200|name=Wally|image=wally.jpg.jpg|nolink=true}} |
||
| + | {{itembox/bottom}} |
||
| + | |||
| ⚫ | |||
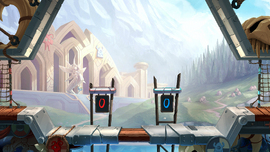
Revision as of 20:30, 8 May 2022
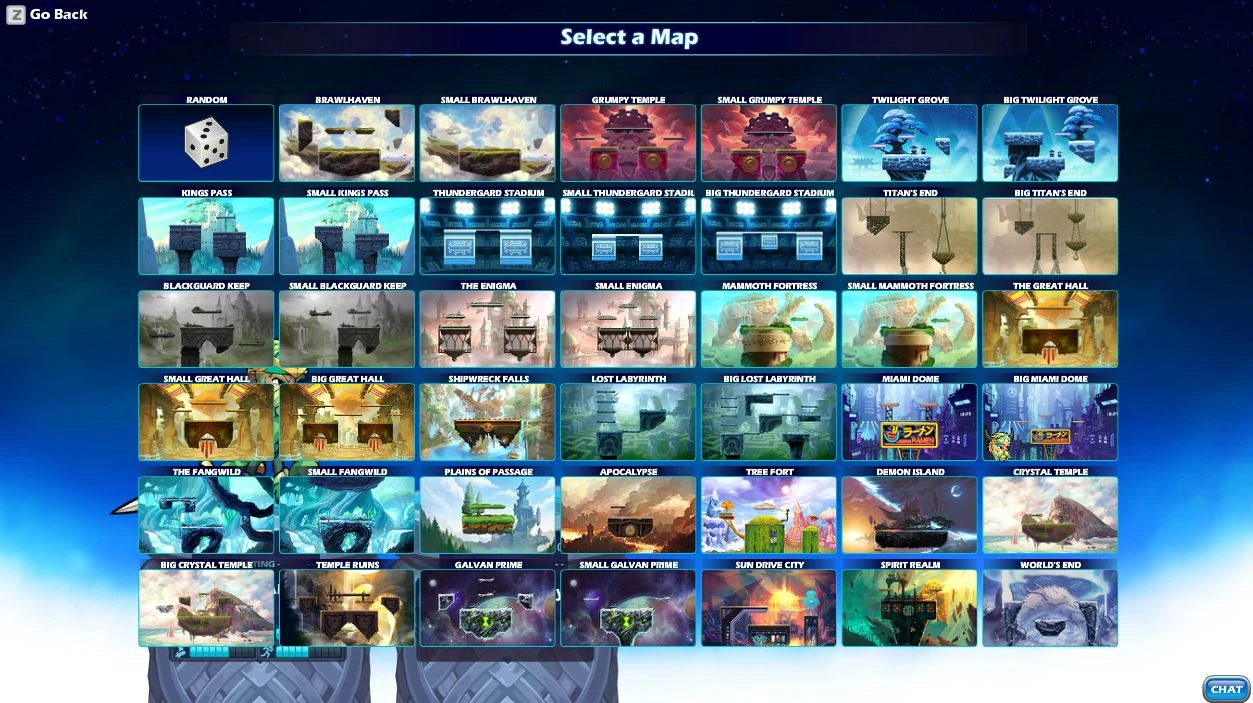
Map Selection Screen in Training Mode
Maps (previously called Realms) refer to the myriad stages and locations where the battles of Brawlhalla are fought. These can vary from prehistoric temples of bone and stone to floating platforms above a steam-driven Victorian city. Some correspond to certain characters and themes, others do not.
Maps can come in three sizes: small, standard, and big. Each map has a standard sized variant, while only certain maps have small, big, or both variants. Typically, smaller maps are intended for 1v1 and larger maps are intended for free-for-all matches, however this is different per map.
In Custom Online lobbies, players can vote for what map they want to play and change the Map Set freely. Maps are selected randomly in Casual Matchmaking and Ranked, but the player has the option to ban a single map from play.
List of Maps
Regular Maps
The following maps can be played on in regular gamemodes:


Gamemode Specific
The following maps can only be played on certain gamemodes:


Test Maps
Test Maps are special maps that are generally added so the devs can receive feedback on the map's design. These maps can only be accessed through custom games with the test maps setting enabled, or through experimental queues (if any are available). Unlike regular maps, test maps do not have any finalized theme, instead reusing art assets from other maps.
If a test map is well received, it will graduate into a full map, where it will receive a new name and theme. Otherwise, test maps will either stay exclusively as test maps or become entirely unavailable after some time.
Available Test Maps
Currently, there is only one available test map:

This list is a work in progress:
| Wally |
|---|
|