Attacks are one of the core components in Brawlhalla. Each player must attack in order to KO their opponents and ensure their victory.
Damage[ | ]
Brawlhalla's damage system doesn't use health or hit points. Legends instead have a damage meter which shows how much total damage they have taken. As the damage taken by a Legend increases, the Legend is knocked further by each attack, making them easier to KO as the game goes on. Often, players on high damage are killed quickly by a single powerful attack. A player therefore has two challenges: firstly to put their opponent into high damage, and secondly to secure the critical KO afterwards.
Calculating Damage[ | ]
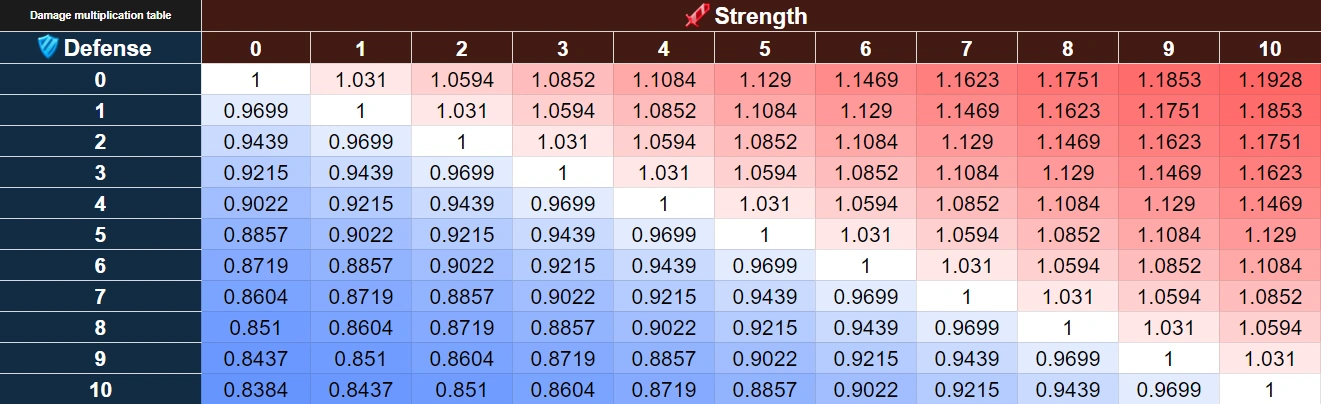
Damage multiplication chart
The damage an attack deals is based on the attacker's Strength and the opponent's Defense.
If the attacker's Strength and the opponent's Defense are the same value, the damage dealt will have a 1x multiplier (this is called base damage). This multiplier increases if the attacker's Strength is higher, and decreases if the opponent's Defense is higher.
See the damage multiplication chart for how each Strength vs. Defense matchup impacts damage.
Additionally, for Signature attacks only, Charging an attack will slightly increase its damage.
Damage from item throws[ | ]
Different items do different amounts of damage when hitting a player.
Certain items get a base damage on hit:
- Bomb - 25 damage
- Mine - 15 damage if thrown, 27 damage if touched while sticking to a surface
- Sidekick summoner - 1 damage
- Boomerang - 5 damage
- Sticky bomb - 1 damage when sticking to someone (this includes passing it), 33 damage on explosion
- Snowball - 30 damage
- Water balloon - 1 damage
- Water bomb - 50 damage
- Table explosions in Brawldown - 27 damage
- Oddball - 10 damage
Some items have their damage scaled by their speed, at different rates. Each 0.384 units per frame over 19.2 contributes:
- Blasters - 0.05 damage
- Katars - 0.05 damage
- Gauntlets - 0.05 damage
- Orb - 0.05 damage
- Battle Boots - 0.05 damage
- Sword - 0.04 damage
- Hammer - 0.04 damage
- Lance - 0.04 damage
- Spear - 0.04 damage
- Axe - 0.04 damage
- Bow - 0.04 damage
- Scythe - 0.04 damage
- Cannon - 0.04 damage
- Greatsword - 0.04 damage
- Spike ball - 0.3 damage
- Summoner horn - 0.05 damage
- Boomerang - 0.1 damage
- Sticky bomb - 0.05 damage, only when hitting someone for the first time
- Chairs - 0.3 damage
- Table pieces - 0.3 damage
- Oddball - 0.5 damage
Damage Color[ | ]
The amount of damage a Legend has received is indicated by:
- a damage indicator that uses color to show damage (found in the top right of the screen)
- the color the Legend flashes when hit which corresponds to the color on the damage indicator
The colors can be expressed as white, yellow, orange, red and black (shown below). However, each color has a range of shades on a gradient. For example, a pale orange color denotes less damage than a deep orange color, though each are of course orange.
The majority of KOs happen at around 150-200 damage. Once a player's damage meter reaches red (between 150 to 700 damage), the knockback from each attack drastically increases. The table below breaks down this relationship.
| Amount of damage | Colour of damage indicator | Additional notes |
|---|---|---|
| 0 | White | No hits at all – the normal color right after (re)spawning |
| 50 | Yellow | After taking a few hits |
| 100 | Orange | After a couple of combos |
| 150 | Red | This player is one short combo away from getting KOd by most signatures |
| 200 | Darker Red | Even the most defensive of signatures will KO this player |
| 250 | Even Darker Red | Even a light unarmed attack will KO this player |
| 300 and more | Many Bruises Black | Practically unseen in fights – even a thrown weapon will KO this player. Sudden Death puts all surviving players at this color. |
Between each range of 50 damage, the color for damage is calculated slightly different. The following table shows how to calculate the RGB color for damage values within each range.
| RGB | 0-50 | 50-100 | 100-150 | 150-200 | 200-250 | 250-300 | 300+ |
|---|---|---|---|---|---|---|---|
| Red | 255 | 255 | 255 | 255-64*(Damage-150)/50 | 191-51*(Damage-200)/50 | 140-66*(Damage-250)/50 | 74 |
| Green | 255 | 255-102*(Damage-50)/50 | 153-153*(Damage-100)/50 | 0 | 0 | 0 | 0 |
| Blue | 255-255*Damage/50 | 0 | 0 | 0 | 0 | 0 | 0 |
Items[ | ]
Weapons[ | ]
- For more in depth information on Weapons and Weapon throws, see Weapons
Weapons are the best means of dealing damage and knocking out your opponent. They will generally allow a Legend to extend their reach and increase their damage output during a fight, as well as allowing them to instantly change their fighting style mid-match. Weapons can be used to attack your opponent, and can also be thrown to attack your opponent at range.
Gadgets[ | ]
- For more in depth information, see Gadgets
Gadgets are various items that appear on a Brawlhalla stage during a brawl.
Most gadgets are throwable items that will deal damage to your opponent, though the Horn, in addition to being throwable, can be used to call your Sidekick across the stage to:
- bring a weapon to the location you used the item from that you or your opponents can pickup.
- do damage in a horizontal line, which can be used to damage or distract your opponent
Gadget Catching[ | ]
By pressing the grab button at the right moment, you can catch any Gadget thrown in the air. This technique is useful against opponents throwing bombs but also risky. To practice this technique, a special bomb catching training room is available in Training Mode.
Disarming[ | ]
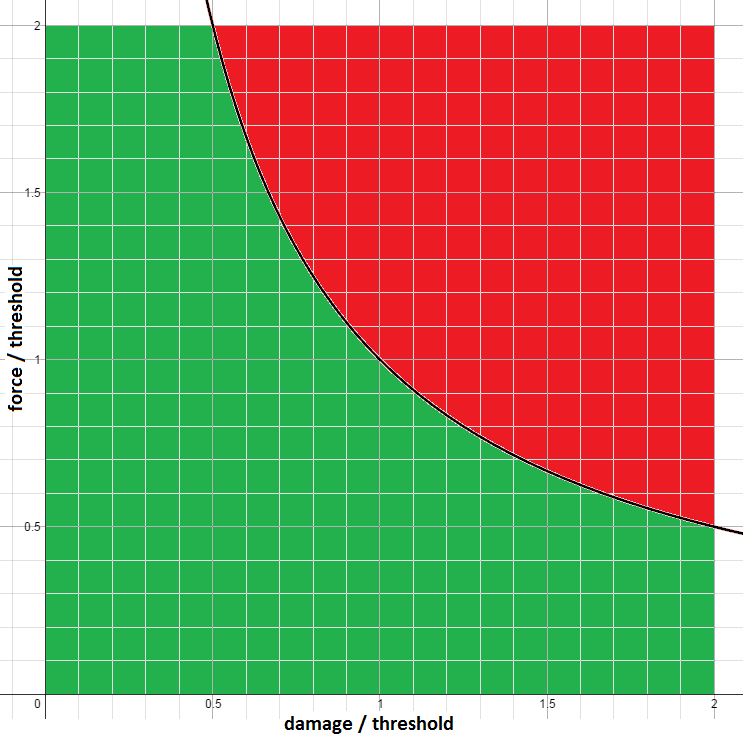
Visual graph for disarming items.
During combat, if enough damage and force is endured, the player will drop whatever item they are holding after being hit. This is mostly done to put already high damage players into a more precarious position if they're taking damage and still haven't been knocked out.
The formula for losing a held item is if X * Y >= 1, where:
- X = (Damage taken with item held) / (Item's damage threshold)
- Y = (Force of the attack) / (Item's force threshold)
X and Y are both capped at 2.
Each item has different damage/force threshold, which are as follows:
- Weapons have a damage threshold of 70 and force threshold of 65.
- Sidekick Summoners have a damage threshold of 35 and a force threshold of 40.
- The following items have a damage AND force threshold of 1 (meaning they are dropped in one hit):
- Bombs (in all gamemodes)
- Spike Balls
- Mines
- Boomerangs
- Sticky Bombs
- Brawlballs in the Brawlball gamemode
- Water Bombs in the Water Bomb Bash gamemode
- Tables and Table Pieces in the Brawldown gamemode
- Flags in the Capture the Flag gamemode
- The Oddball in the Oddbrawl gamemode has a damage and force threshold of 999 - however it is still dropped in one hit.
- Any other item not listed here has a damage threshold of 70 and force threshold of 65.
With this formula, you will drop a held item if you reach both damage and force thresholds, but also if you reach half the threshold of one and twice of the other.
Picking up a new weapon or gadget will reset the damage threshold.
Attacking[ | ]
Overview and Main Attacks[ | ]
The primary aim of the game is to attack the opponent. All attacks deal both damage and knockback to varying degrees.
You can attack using:
Each Legend has two different weapons, as well as a universal set of unarmed attacks.
When attacking, three parameters are taken into account.
- Light / Heavy Attacks - two types of attack, each assigned a separate button.
- Aerial / Grounded Attacks - different attacks according to whether or not the player is in the air.
- Direction - different attacks according to directional inputs: the assigned Up/Down/Left/Right keys. This produces either 'Neutral', 'Side' or 'Down' inputs ('Up' and 'No Input' are both under 'Neutral').
Following these three different criteria, every single weapon in the game has 11 different attacks available to it (there is no Aerial Side Heavy). They can be written in a range of ways, but are mostly described as below. (Sometimes N, S and D denote Neutral, Side and Down respectively). Attacks that don't said 'Air' or 'Aerial' are presumed grounded.
| Type | Light Attacks | Heavy Attacks |
|---|---|---|
| Grounded Attacks |
• Neutral Light • Side Light • Down Light |
• Neutral Heavy • Side Heavy • Down Heavy |
| Aerial Attacks † |
• Aerial Neutral Light • Aerial Side Light • Aerial Down Light |
• Recovery • Ground Pound |
† There are only two Aerial Heavy attacks. The Aerial Neutral Heavy is referred to as a Recovery, and the Down Heavy is referred to as a Ground Pound. There is no Aerial Side Heavy, and these names better describe the attacks.
Legend Specific Signature Attacks[ | ]
All grounded Heavy attacks are also Signature Attacks. This is because they are utterly unique to a specific Legend and Weapon. For example, the attack produced when Asuri, holding a Sword, does a Neutral Heavy is unique to Asuri's Sword. The same is true for her Side and Down Heavies with the Sword. Every weapon has three Signatures attached to it - meaning every Legend has 6 unique Signatures. To write this, one would say the Legend's name and weapon, such as: Asuri's Neutral Sword or Gnash's Down Hammer.
Due to the similarity between the use of the word Heavy and Signature, these terms can be interchangeable. There are two instances where one would call an attack a Heavy but not a Signature. Firstly, Aerial Heavies are not Signatures, as Recoveries and Ground Pounds are not unique to Legends. Secondly, unarmed Heavy attacks are not technically Signatures. Every Legend shares exactly the same set of unarmed attacks. The unarmed Heavy attacks are therefore not unique, and not 'Signatures'. However, all players would understand what an Unarmed Side Heavy was - the difference here is technical, and unimportant.
Attack Priority[ | ]
In cases where two opponents hit each other at the same time, the attack with the highest priority will hit. Attack priority can be determined by the following list, with Weapons always beating unarmed:
| Highest Priority | Lowest Priority | |||
|---|---|---|---|---|
| Signatures | Gravity Cancelled Signatures | Light Attacks | Gravity Cancelled Light Attacks | Aerial Attacks, Recovery, Ground Pound |
If both attacks hit at the same time and are the same priority, a Clash will occur - this simply knocks both opponents away from each other, giving neither player an advantage over the other.
Stun[ | ]
In addition to dealing damage to an opponent, successful attacks will also Stun an opponent for a short period of time. While an opponent is stunned, they cannot move or attack - all inputs will fail for the duration of the stun.
Every attack has a fixed number of stun frames, that isn't scaled with damage. However, the stun period is extended as long as the stunned player is moving fast enough (over 96 units per frame). This means that attacks with short stun time but high force can keep the opponent stunned for longer.
Different attacks stun opponents for different times - an attack that stuns an opponent for a long time may not do a lot of damage or knockback, and vice versa. Certain attacks that "grab" the opponent and move them around when they land will stun the opponent for the duration of the attack.
Moving downwards through a soft platform while stunned multiplies the player's vertical acceleration by 0.8.
Force[ | ]
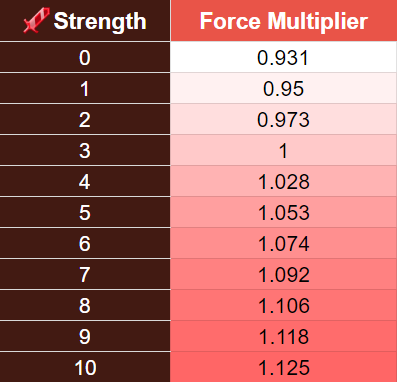
How Strength affects variable force.
Also called Impulse or Knockback. This is how far away your opponent is sent flying after getting hit by an attack. Different attacks deal a different amount of force.
There are 2 different types of forces:
- Variable Force: Affected by damage, strength, and charge time. Variable force scales with those conditions and is generally responsible for what makes something a good KO attack. This is affected by the Strength stat, dealing greater force with higher Strength.
- Fixed Force: NOT affected by damage, strength, or charge time. Fixed force is what is essentially responsible for the base knockback of attacks at white. Attacks with only fixed force typically do not KO and are used as setup attacks.
Force is always applied AFTER the damage from an attack.
When a player with X damage (after adding the attack's damage) is hit, the attack's base variable force will be multiplied by (X/100 + X*X/20000).
In Street Brawl, despite being a health-based gamemode, variable force still has an effect. The player's effective damage, for the purpose of calculating variable force, will be 50 + the attack's damage.
When a player hits a teammate with an attack, there is a 0.75 multiplier to the variable force. This multiplier does not apply for throws.
In Street Brawl and Buddy, 1/10th of the resulting force (variable + fixed) will be added to the player's damage.
Startup Time[ | ]
Startup time is how long it takes for an attack to start after pressing the attack button.
Light attacks generally have a faster startup, and heavy attacks generally have a slower startup.
During startup time, the player can't do anything as the attack they just performed is queued up. An opponent could take advantage of this time to land their own attack.
Recovery Time[ | ]
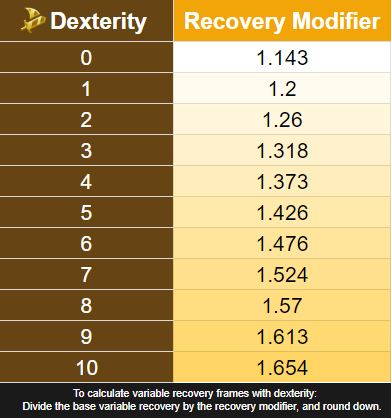
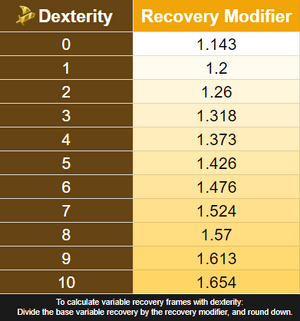
How Dexterity affects variable recovery.
Recovery time (also called recover time, recovery frames, or endlag) is how long it takes after an attack for a player to be able to perform another action, such as moving, jumping, attacking, etc.
The amount of recovery time on a move is different per weapon and per Legend, and is determined by adding two components:
- Fixed Recovery Time: a number of frames where a player is stuck after an attack, regardless of Legend.
- Variable Recovery Time: an additional number of frames where a player is stuck dependent on Dexterity.
The lower a Legend's dexterity is, the higher the variable recovery time will be, and vice versa.
Additionally, there is a difference in recovery time for attacks that miss and attacks that hit:
- Recovery Time on hit: typically shorter to allow for follow up attacks.
- Recovery Time on miss: typically longer to punish the player and give the opponent a window of opportunity.
Cooldown[ | ]
Cooldown is an additional amount of time added to the end of recovery time. During cooldown, the player is unable to use the same attack they just used. This is used to promote variety in attacks, as other moves can still be used during cooldown.
The cooldown for an attack is different per weapon and attack, and is also shorter on attacks that hit compared to attacks that miss. However, unlike recovery time, cooldown is NOT affected by dexterity.
If a certain attack is on cooldown, and a second one finishes before the first attack's cooldown is over, the second attack will also be on cooldown. However, if a third attack is finished before the first attack's cooldown is over, that third attack's cooldown will overwrite the second's, allowing it to be used again.
A 10 frame cooldown is also applied globally for signature attacks.
Unarmed heavy attacks do not have cooldowns, meaning the same attack can be used repeatedly without delay. This is also true for Cross' Blasters side-signature and down-signature.
Charging[ | ]
When holding down on the heavy attack or throw button, the player charges their attack or throw. Charging makes the attack/throw occur later.
Charged attacks have increased damage and variable force. A full charge multiplies both by 1.25 (a 25% increase).
Charged throws will launch at a faster speed, which causes them to do more damage.
If a player runs off of a platform while charging an attack, they can continue to charge while moving downward. This is called a slide charge.
Charging attacks should be used very carefully, as it gives an opportunity for your opponent to set up and counterattack you.
Gravity Cancel[ | ]
Unique Attacks[ | ]
Certain weapons and attacks have unique properties attached to them.
Active Inputs[ | ]
Active inputs are an attack property unique to the Scythe, Battle Boots and several Signature attacks. The core concept of active inputs is that holding a different directional key after an initial hit will result in the attack finishing in a different way. Active input attacks only have two variant outcomes; one for holding the relevant directional key, and one for holding any other directional key (or none at all).
List of Light attacks with active inputs:
| Weapon/Legend | Attack | Direction Held | Outcome |
|---|---|---|---|
Scythe |
Side Light | Forward | The user swings their Scythe a second time, causing knockback. |
| Other | The user quickly kicks the opponent in the air with little knockback. | ||
| Down Light | Forward | The user kicks the opponent forward, causing knockback. | |
| Other | The user spins their Scythe with the opponent caught in it, carrying the opponent to the opposite side of the user. | ||
| Neutral Air | Backwards | The user carries the opponent to their other side and kicks them horizontally. | |
| Other | The user kicks the opponent diagonally forward, causing knockback. | ||
| Down Air | Backwards | The user carries the opponent backwards with their Scythe. | |
| Other | The user throws the opponent diagonally downward with their Scythe. | ||
Battle Boots |
Side Light | Forward | The user kicks three times and ends airborne. |
| Other | The user kicks three times and ends grounded. | ||
| Down Light | Down | The user performs a leg sweep and a downward kick, ending grounded. | |
| Other | The user performs a leg sweep and a jumping side kick, ending airborne. | ||
| Side Air | Forward | The user kicks twice into a spinning kick, making them travel forward. | |
| Other | The user kicks twice into a single stronger kick, staying in the same place. | ||
| Down Air | Down | The user kicks diagonally downward, travelling downward with the opponent. | |
| Other | The user kicks diagonally downward, jumping off the opponent. |
For signatures with active inputs, see Active Input Signatures.
Openers, Bridges & Closers[ | ]
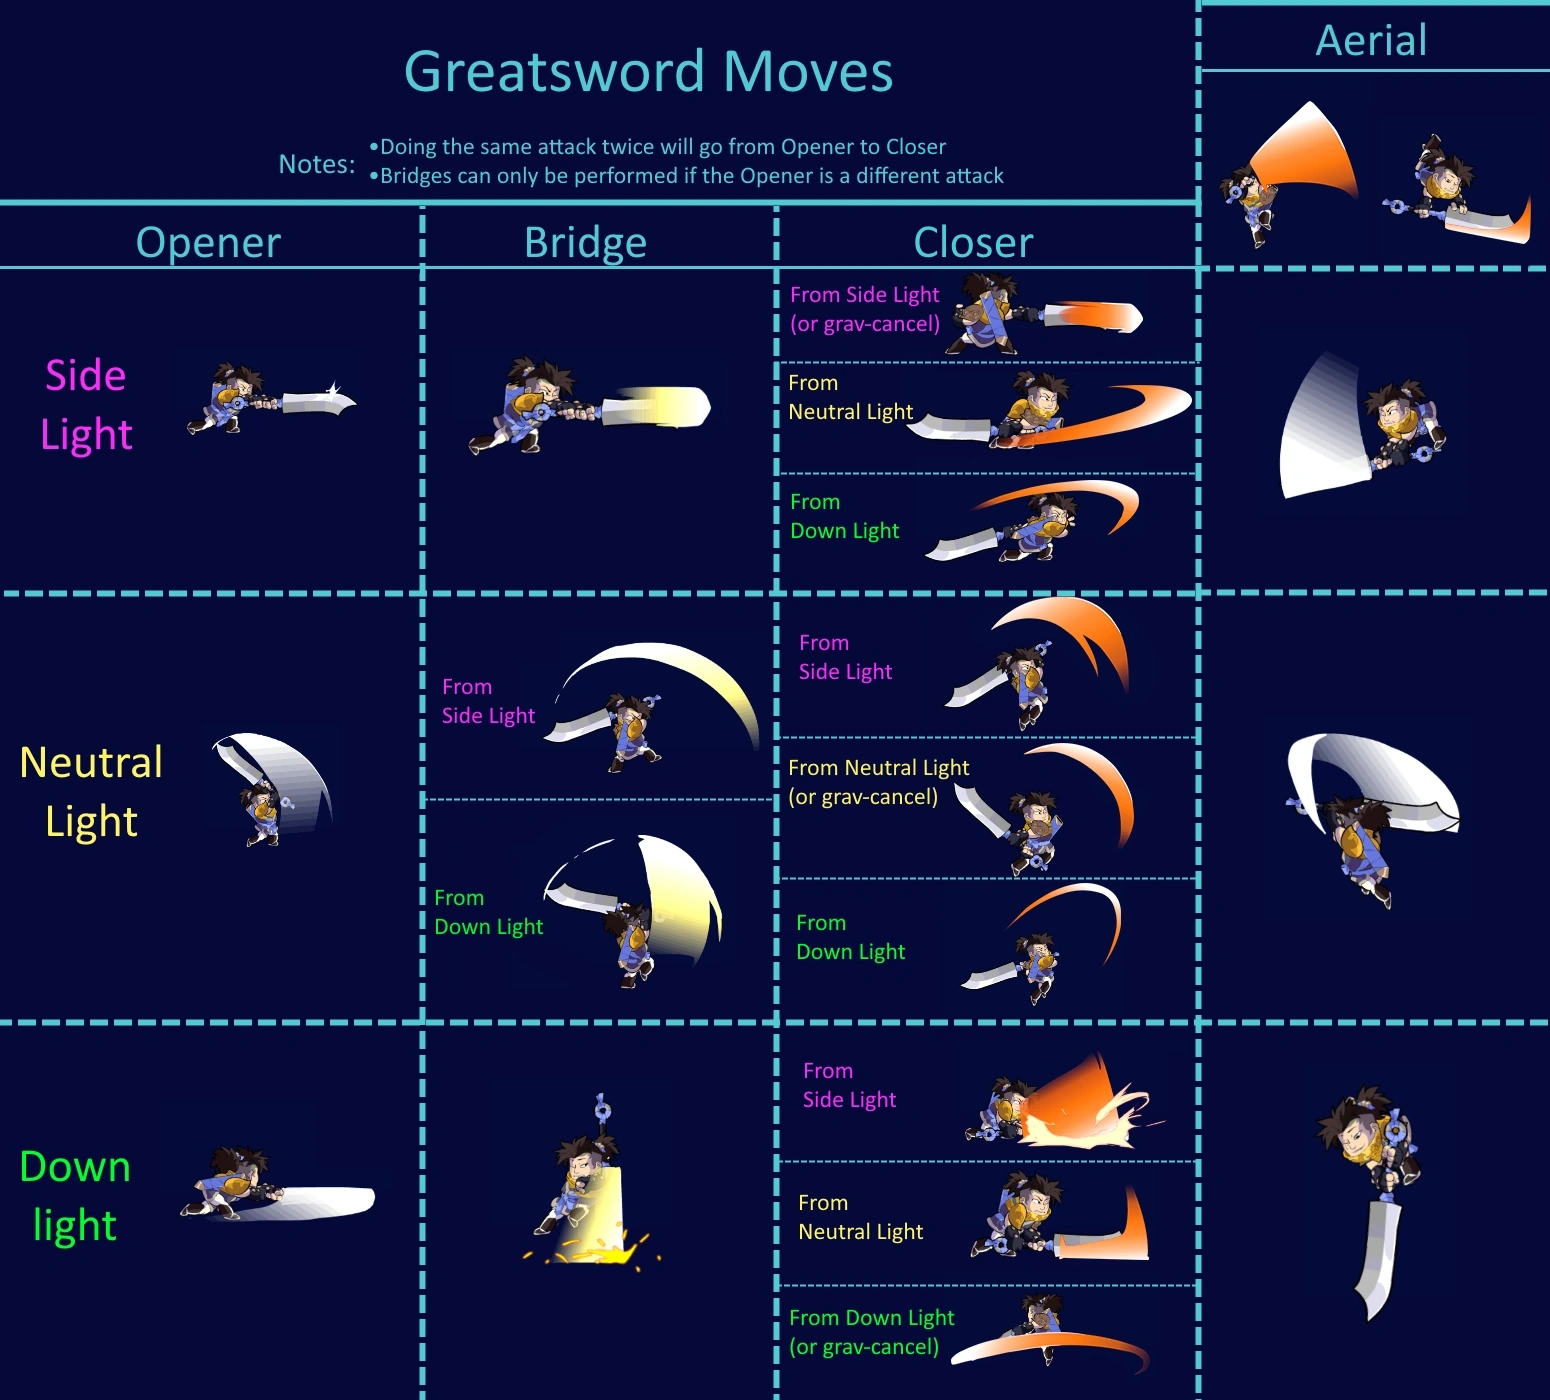
All possible non-sig moves on Greatsword
The Greatsword has a unique kit that includes three types of attacks: openers, bridges, and closers. These are light attacks used together to create unique strings only possible with the Greatsword.
Each of these attacks has unique distinctions:
- Opener: The first attack, has very little knockback and is used to set up a bridge or closer attack.
- Bridge: Another attack with little knockback, this is used to cause more damage between an opener and a closer. A bridge can only be used after an opener attack if it is a different light attack than the opener.
- Closer: The final attack, with very heavy knockback. Closers occur after bridge attacks or by using the same light attack as the opener.
In addition to the uniqueness of each attack, each attack will affect what the subsequent attack will be. For example, a Down Opener will cause a Down Closer to be a spin attack, but a Side Bridge will cause a Down Closer to be a ground slam attack. This expands the moveset of the Greatsword and allows it to perform 16 unique grounded Light attacks, compared to the regular 3.
Dash Cancel[ | ]
Dash Cancelling is a technique specific to the Greatsword. After hitting a player with an Opener or Bridge attack, dashing will cancel the attack chain and reset your next attack to be another Opener. This technique is used when attempting to predict what direction your opponent will dodge after attacking them, and can be used to juggle your opponent once their dodge is on cooldown.
Dash cancelling backwards is the easiest way to dash cancel, however a forward dash cancel can be performed by holding down while pressing the dodge button after your attack. Dash cancelling forward is typically better than chase dodging forward, as chase dodging will put your dodge on cooldown.
Terrain Impacted Attacks[ | ]
Usually attacks are not impacted by terrain; most attacks perform the same regardless if they're on the stage, off the edge or into a wall. A certain amount of attacks have unique properties depending on the terrain, however.
List of terrain impacted Light attacks:
| Weapon/Legend | Attack | Regular Attack | Terrain | Resulting Attack |
|---|---|---|---|---|
Rocket Lance |
Down Air | The user thrusts their Lance diagonally downward. | Into Ground | The Lance hits the ground, causing the attack to slide across the ground. |
Axe |
Down Air | The user swings their Axe downward, hitting everything below them. | Into Ground | The user swipes the ground with their Axe, hitting slightly in-front of them and behind them. |
Bow |
Down Light | The user shoot an arrow onto the ground, causing a splash of damage. | Off Edge | There is no longer a splash at the end of the attack, resulting in a smaller attack hitbox. |
| Down Air | The user shoots an arrow diagonally downward. | Into Ground | The arrow hits the ground and causes a splash of damage, resulting in a larger attack hitbox. | |
Cannon |
Down Air | The user shoots a blast out of their Cannon diagonally downward. | Into Ground | The blast ricochets off the ground, reaching slightly further. |
Orb |
Down Air | The user throws their Orb diagonally downward. | Into Ground or Wall | The Orb bounces off of any terrain it collides with at three possible ranges before returning to its user. |
| Into Ground | If the attack is fully grounded, the player will perform a small jump forward with their hand during the attack, known as a "handspring". The Orb can collide with ground and bounce off it if the user isn't near a ledge. | |||
Greatsword |
Any Aerial | The user performs the move as a standalone attack. | Into Ground | The move can now be used as an Opener and be followed up by a Bridge and/or Closer attack. |
Unique Signatures[ | ]
Given the large amount of Signature attacks in Brawlhalla, many of these attacks have their own unique properties to further diversify the game's roster and their movesets.
To view a list of different Signature properties, see List of Signature types.
Exhausted Recovery[ | ]
An Exhausted Recovery attack occurs when using a Recovery attack after already having used a Recovery before touching the ground.
Exhausted Recoveries travel a shorter distance than regular Recoveries, and count as jumps while in the air. This means that you can perform up to 2 Exhausted Recoveries after a standard Recovery, but you will have no more jumps afterward.
Exhausted Recoveries also typically deal more damage and knockback than regular Recoveries.
Technique[ | ]
String[ | ]
A string is when a player lands multiple attacks in rapid succession on an opponent. Strings are a fast way to build up damage on the opponent.
Generally, strings use light attacks, as their fast startup and recovery times make it easy to chain multiple hits together.
Combo[ | ]
A combo (also called a true combo) is a type of a string where there are no dodge frames between attacks. This occurs when the stun of the first attack is longer than the recovery time of the first attack and the startup time of the second attack (+ 2 frames to account for dodge startup). Since the opponent cannot dodge in time, they are forced to take another hit.
Combos can be tested in Training mode with the "Show Stun" option enabled - if no dodge frames appear after the first attack, it's a combo.
There are only two instances where a combo can be escaped.
The first is with the directional influence mechanic; if a combo uses the same move more than once, the opponent can hold a direction to change the trajectory they are launched once the same move hits twice.
The second (and very rare one) happens when the two startup frames of a dodge, which don't have inviniciblity but do have momentum, move you enough to escape. The most common example would be Queen Nai's dlight into gravity-canceled nsig combo on spear. It is normally true, but by inputting an up dodge fast enough, one can escape.
Gimping[ | ]
A gimp is when a player is knocked out, typically at low damage, because their recovery was interrupted by an attack.
Attacking an opponent who is mid-recovery cancels their recovery. If they are low enough on the screen and have no jumps or dodges left, attacking them to block or interrupt their recovery can secure you a knockout.
X-Pivot[ | ]
An X-pivot is when your momentum is reversed from an attack that is done to a direction opposite to your current one.
To perform an X-pivot, get a burst of enough momentum (from a dash, dashjump, chasedodge, or other) and quickly change directions and attack. If your attack has enough forward momentum, your momentum will quickly be shifted to the opposite direction, making it a good surprise attack.
Not all moves can be X-pivoted (and in fact most can't). This technique is mainly used on blasters, where nair, nlight, dlight, and dair can all be used to perform it.
Slide charge[ | ]
A slide charge is when a heavy attack is charged as the player is falling off the stage or a platform.
To perform a slide charge, start charging a heavy attack near a ledge or the end of a platform, so that your momentum is enough to make you fall off it. This is usually done with a dash, as it provides a lot of momentum.
When done quickly enough, you can input the heavy attack in the opposite direction. This is called a reverse slide charge.
During a slide charge or a reverse slide charge, you can hold forward or backwards to slightly drift in that direction. This can be used to position the attack better.
Slide charges and Reverse slide charges are mainly used on heavy attacks that send downwards, as when hit offstage on an opponent with high enough damage, those attacks can kill very early.